![DQS_White_RGB-1.png]](https://learn.dqsglobal.com/hs-fs/hubfs/DQS_White_RGB-1.png?height=40&name=DQS_White_RGB-1.png)
Sequences consist of a predefined series of emails, tasks, and reminders that are executed over a defined period. They ensure timely follow-up, improve response rates, and support consistent customer communication throughout the sales process.
Sequences are intended for one-to-one sales communication and should only be used for contacts with whom an individual business relationship exists.
Typical Use CasesSequences can be used in many different sales scenarios, including:
- Initial outreach to new prospects
- Follow-up after trade fairs and events
- Request for additional information
- Quotation follow-up
- Customer reactivation campaigns
- Existing customer communication
- Cross-selling and up-selling initiatives
- Reminder sequences after meetings or calls
- Follow-up after webinars or marketing campaigns
The appropriate sequence should always be selected according to the customer journey and sales objective.
Benefits of Using SequencesUsing HubSpot Sequences provides several advantages:
- Standardized customer communication
- Consistent follow-up
- Time savings through automation
- Improved customer experience
- Higher transparency
- Better tracking of customer engagement
- Increased response rates
- Reduced risk of missed follow-up activities
A typical sequence may contain:
- Personalized sales emails
- Follow-up reminders
- Manual call tasks
- LinkedIn connection tasks
- Follow-up emails
- Meeting requests
Emails are sent according to the configured schedule until:
- the sequence is completed,
- the contact replies,
- the user manually unenrolls the contact, or
- another predefined exit criterion is met.
When using sequences, take note of the following:
- To send sequences, you must have a connected personal email address. A team email address connected to the conversations inbox cannot be used to send sequence emails. Sequence emails are one-to-one sales emails and are sent through the connected personal email address, not through HubSpot's marketing email servers.
- There's a limit to the number of sequences that can be created in your account by all users. You can view the total number of sequences created in your account in the top right corner of the sequences dashboard. Learn more about these limits in HubSpot's Product & Services catalog.
- Any tasks in a sequence will be assigned to the user who enrolled the contact into the sequence.
- When using a workflow to send sequence emails, the selected sender must have an assigned Sales or Service seat.
Enroll contacts in a sequence
You can enroll individual contacts or enroll multiple contacts in bulk. In HubSpot, contacts can be enrolled from:
- The sequence tool and embedded automation within the sequence tool
- An individual contact's record
- The contacts index page
- Active and static lists
- Contact-based workflows (Sales or Service Hub Enterprise only)
You can also start a sequence from your inbox using the HubSpot Sales extension. Learn how to enroll contacts in sequences from your inbox using the HubSpot Sales Chrome extension, the HubSpot Sales Outlook desktop add-in, or the HubSpot Sales Office 365 add-in.
When you enroll a contact into a sequence, you may see an error message stating that the contact can't be enrolled. For example, if the contact is missing an email address or has previously bounced. Learn more about troubleshooting sequence enrollment issues.
Before you get started
When enrolling contacts in a sequence and when sending a sequence from the contact owner property, please note the following:
- You must have a connected personal email inbox.
- The sequence must be shared with the user selected as the sender. If the user does not have permission to access the sequence, enrollment will fail.
- Each contact can only be enrolled in one sequence at a time. To enroll a contact in a different sequence, they must first be unenrolled from their current sequence.
- To enroll multiple contacts at once, users must have Bulk enroll sequences permissions turned on.
- There is a limit to the number of sequence emails a user can send each day.
- HubSpot will not be able to increase the sequence email send limit.
- If a user exceeds their daily send limit, the contact won't enroll in the sequence.
- Refer to the Sequences item in HubSpot's Product & Services Catalog to review the daily send limit for your subscription.
- When manually enrolling a contact in a sequence, you must choose one of your own connected email accounts as the sender. To send a sequence on behalf of another user, you must use a workflow.
Manually enroll contacts in a sequence
You can enroll individual contacts from the sequence tool in HubSpot or from their contact records.
To enroll a contact from the sequence tool:- In your HubSpot account, click More, then navigate to Sales > Sequences. If More doesn't appear in your account, navigate to Sales > Sequences directly.
- At the top, click the Manage tab.
- Click the sequence name.
- In the top right of the sequence page, click Enroll contacts and select Enroll contacts.
- In the right panel, select the checkbox next to the name of the contact you want to enroll.
- At the bottom, click Next.
-
- Navigate to your records:
- Contacts: In your HubSpot account, click More, then navigate to CRM > Contacts. If More doesn't appear in your account, navigate to CRM > Contacts directly.
- Companies: In your HubSpot account, click More, then navigate to CRM > Companies. If More doesn't appear in your account, navigate to CRM > Companies directly.
- Deals: In your HubSpot account, click More, then navigate to CRM > Deals. If More doesn't appear in your account, navigate to CRM > Deals directly.
- Tickets: In your HubSpot account, click More, then navigate to CRM > Tickets. If More doesn't appear in your account, navigate to CRM > Tickets directly.
- Custom objects: In your HubSpot account, navigate to CRM, then select the custom object.
- Select a record.
- In the left panel, click the emaisequencesEnroll in a sequence icon. You may need to click the ellipses More icon and then click the sequences Enroll in a sequence icon.
- If you're enrolling a contact from another record type (e.g., a company or deal), select the associated contact that'll enroll in the sequence.
- In the dialog box, hover over the sequence and click Select.
- At the top of the Select sequence dialog box, click the Start at dropdown menu and select the step where the contact should start the sequence.
- Then, click the Time zone dropdown menu and select a time zone. All steps will be executed in the selected time zone.
- To override the sequence's default follow-up settings, in the top right, click Settings. These settings only apply to the emails and tasks that execute after the first step in the sequence.
- By default, the first email in the sequence will send as soon as possible. To set a send time for the first step:
- Click the Send now dropdown menu and select Send later.
- Then, select a date and time.
- Navigate to your records:
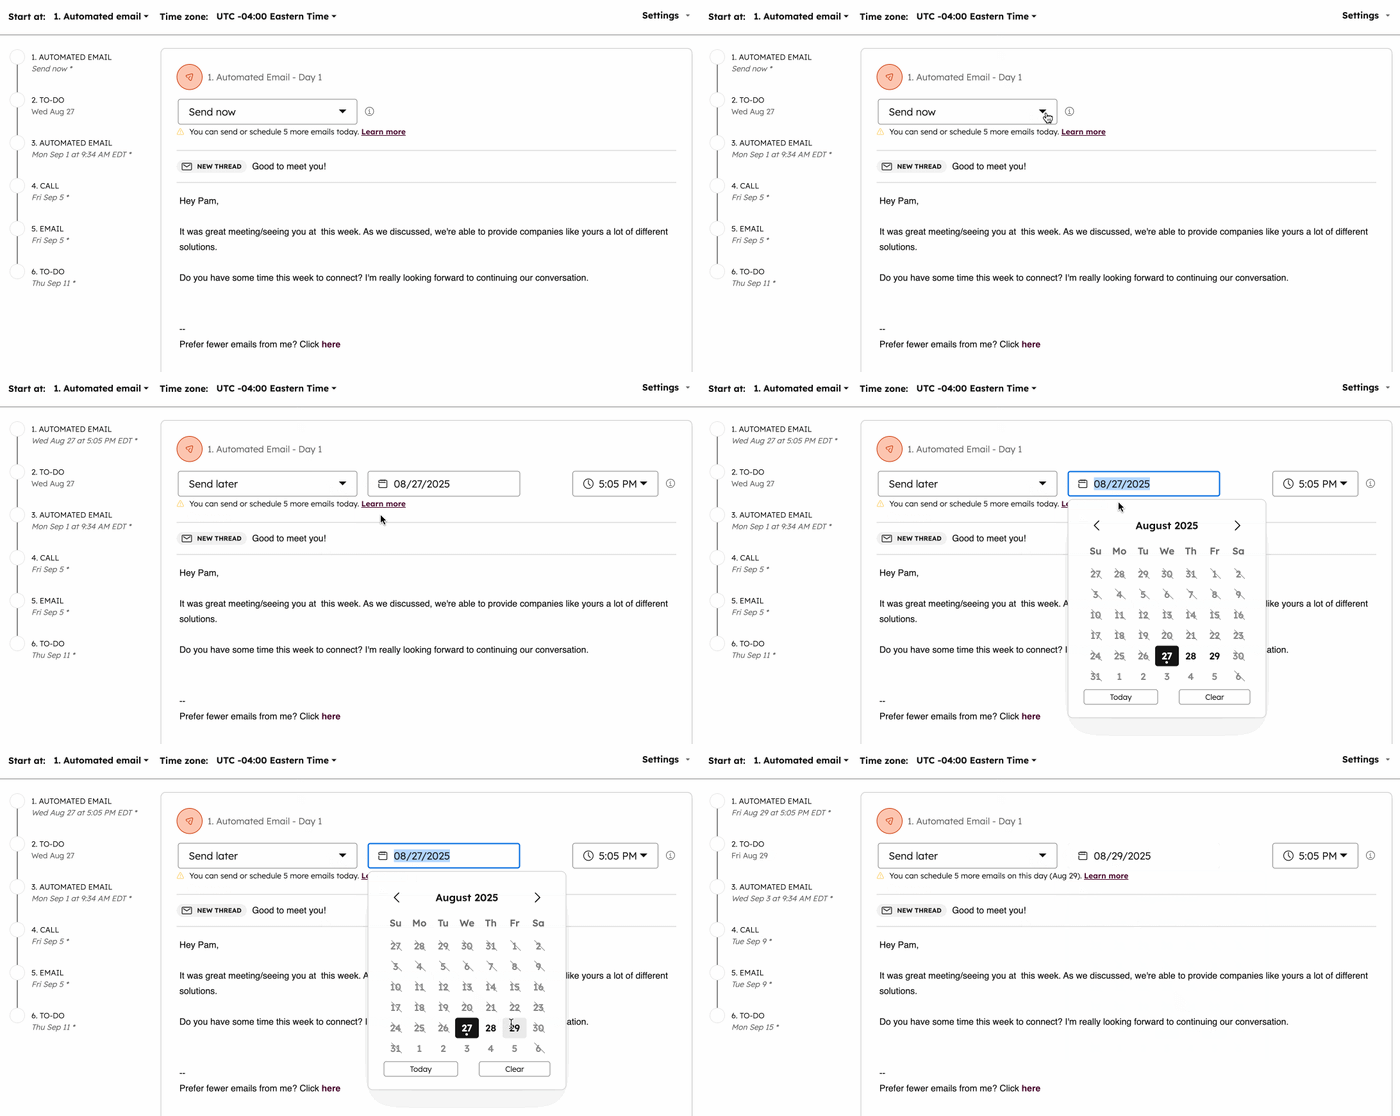
- For subsequent emails, in the Send email in section, select how many days should pass after the previous step before the email is sent.
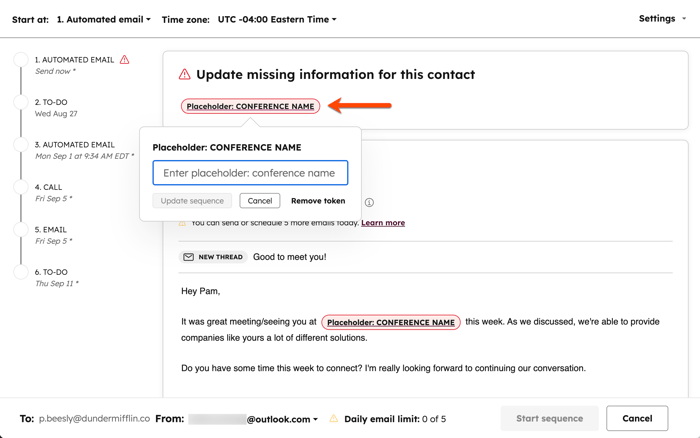
- If you're using placeholder tokens in an email and values are missing for the selected contact, the tokens will appear in red at the top:
- Click a token and enter a value for the token.
- Click Update all. Repeat for each token in the template.
Enroll multiple contacts in a sequence
Users with Bulk enroll sequences permissions can enroll up to 50 contacts in a sequence at once. Enroll multiple contacts when you need to follow up with contacts after a trade show or conference, reconnect with contacts from inactive accounts, or send targeted messages to a segmented list of prospects.
- To enroll multiple contacts from the sequence tool:
- In your HubSpot account, click More, then navigate to Sales > Sequences. If More doesn't appear in your account, navigate to Sales > Sequences directly.
- In the top left, click the Manage tab.
- Click the sequence name.
- In the top right of the sequence page, click Enroll contacts.
- In the right panel, select the checkboxes next to the name of the contact you want to enroll.
- At the bottom of the right panel, click Next.
- To enroll multiple contacts from the lists tool:
- In your HubSpot account, navigate to Contacts > Lists.
- Click the name of the list to enroll from.
- To select all contacts in the list, select the checkbox in the top left of the table, then click Select all [x] contacts.
- To select individual contacts from the list, select the checkboxes next to the contacts you want to enroll.
- At the top of the table, click Enroll in sequence.
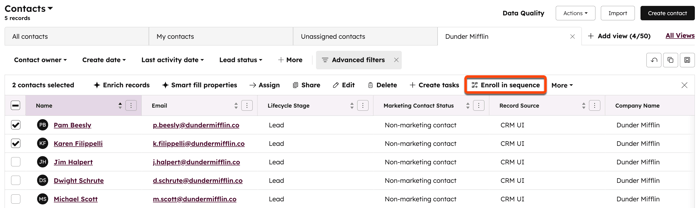
- To enroll multiple contacts from the contacts index page:
- In your HubSpot account, click More, then navigate to CRM > Contacts. If More doesn't appear in your account, navigate to CRM > Contacts directly.
- On the contacts index page, apply filters if needed.
- To select all filtered contacts, select the checkbox in the top left of the table, then click Select all [x] contacts.
- To select individual contacts from the filtered results, select the checkboxes next to the contacts you want to enroll.
- At the top of the table, click Enroll in sequence.
- Hover over the sequence, and click Select.
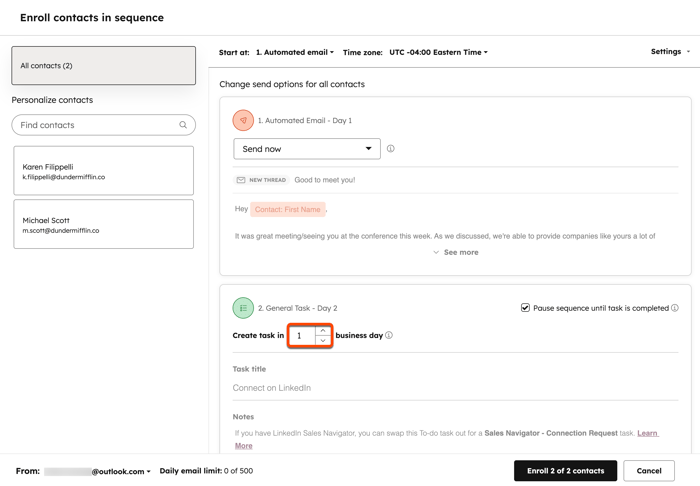
- To customize the follow-up options and delays for all contacts in the sequence, in the left panel, click All contacts.
- In the right panel, at the top, click the Start at dropdown menu and select the step where the contacts should start the sequence.
- Then, click the Time zone dropdown menu and select a time zone. All steps will be executed in the selected time zone.
- To override the sequence's default follow-up settings, in the top right, click Settings. These settings only apply to the emails and tasks that execute after the first step in the sequence.
- By default, the first email in the sequence will send as soon as possible. To set a send time for the first step:
- Click the Send now dropdown menu and select Send later.
- Then, select a date and time.
- For subsequent emails, in the Send email in section, select how many days should pass after the previous step before the email is sent.
- Schedule your sequence tasks:
- To schedule your tasks, set the [number of days] before the task is created.
- To create a task immediately after the previous step executes, on the task step, click the dropdown menu and select Create task immediately.